 ← PostgreSQL Blog
How to Capture Real Client IP in PostgreSQL HA Clusters
How to Capture Real Client IP in PostgreSQL HA Clusters
PTracking which devices are currently connected to your PostgreSQL server and the load they are creating is critical for database security and performance. The following guide will show you how to list active client IP addresses and connection details in real-time.
DISCLAIMER: The following TProxy (Transparent Proxy) configuration involves kernel-level packet manipulation. This setup inherently causes significant performance overhead (higher latency and lower TPS). The author is not responsible for any performance degradation or system instability resulting from this implementation. Proceed at your own risk.
Contents
Introduction: Why Are We Here and What Do We Solve?
A Bird’s-Eye View of Architecture: An 8-Server Cluster Structure
- The Roles of Patroni, etcd, and HAProxy in the Ecosystem
Problem and Solution: Why Does the Client’s Real IP Address Disappear?
- Standart Reverse Proxy vs. TProxy (Transparent Proxy)
Step-by-Step Instructions: How to Install TProxy?
- Step 1: IP Forwarding and Iptables Rules on the HAProxy Server
- Step 2: Configuring PBR (Policy Based Routing) in PostgreSQL Server
- Step 3:
pg_stat_activityVerifying the Real IP Address
Real-World Test: Pgbench Results
- Direct Connection vs. HAProxy (TProxy) Connection
Analysis of the Results: What Do the Metrics Tell Us?
- Why has latency increased? Why has the transaction speed (TPS) decreased?
Conclusion and Future Improvements: Is This Price Worth Paying?
Introduction: Why Are We Here and What Do We Solve?
In enterprise database management, High Availability (HA) is no longer a luxury, but a cornerstone of uninterrupted service. The ability for the system to instantly revert to a backup (failover) in the event of a server failure provides excellent safety net. However, when you add a load balancer (proxy) to the architecture, the biggest nightmare for database administrators (DBAs) begins: all connections to the database appear to originate from the proxy server’s IP address. For enterprise auditing, security logging, and pg_stat_activitytroubleshooting, it is essential to see the client's actual IP address .
In this article, we’ll set aside theoretical discussions and talk about real-world data. We’ll demonstrate step-by-step how to implement a TProxy (Transparent Proxy) structure in an advanced cluster architecture consisting of 8 servers (PostgreSQL/Patroni, etcd, and HAProxy), allowing the client’s real IP address to be transmitted to the database . Then, we’ll examine the performance results of this architecture in stress tests and analyze the cost (latency and TPS reduction) of these network layer rules.pgbench
A Bird’s-Eye View of Architecture: An 8-Server Cluster Structure
Before delving into the magical network-layer settings of TProxy (Transparent Proxy), we need to understand our playing field. High Availability (HA) isn’t just about having a backup server on standby; it’s an orchestration of systems constantly communicating with each other, monitoring the situation, and making decisions within seconds in the event of a disaster.
In this architecture, we have designed a robust structure consisting of a total of 8 servers to completely eliminate the risk of Single Point of Failure (SPOF) . So, who does what in this ecosystem?
The Roles of Patroni, etcd, and HAProxy in the Ecosystem
At the heart of the system are three main components, each with its own area of expertise:
- 3x PostgreSQL & Patroni Server (Data and Management Layer):
- Their responsibilities include storing and processing data and managing the cluster.
- How it works? Our database is standard PostgreSQL. However, each PostgreSQL instance has an agent (daemon) called Patroni running at its head . Patroni constantly monitors the database health, checks for replication delays, and if the Primary (Active) server fails, it automatically declares the most up-to-date of the Replica (Backup) servers as the new Primary (Automatic Failover). The reason we use 3 nodes is to ensure a simple majority (quorum) is always maintained in the system.
- 3x etcd Servers (DCS — Distributed Configuration and Decision Layer):
- Their role: To be the system’s Source of Truth.
- How it works? It acts as an arbiter to prevent Patroni nodes from fighting amongst themselves over who is the leader? or two servers simultaneously believing themselves to be the primary server (split-brain). etcd is a distributed key-value store. Patroni nodes hold the cluster’s current state and the leader lock on etcd. The fact that etcd also consists of 3 servers ensures that this arbiter never crashes.
- 2x HAProxy + VIP (Traffic Routing and Load Balancing Layer):
- Their task is to guide clients (applications) to the correct database.
- How it works: Our applications don’t connect directly to the database IPs. Instead, they arrive at a Virtual IP (VIP) that travels between two HAProxy servers. In the background, the HAProxy queries Patroni’s REST API to find out Who is currently the leader? and always routes incoming read/write requests to the primary server. We use two HAProxy servers to prevent the proxy layer itself from becoming a failure point.
The Critical Intersection: This is where the whole story begins. When applications arrive at HAProxy and HAProxy relays this traffic to PostgreSQL, under standard settings the database assumes all connections are coming from HAProxy . The application’s (client’s) unique IP address is lost at the proxy layer.
In the next section, we will examine why this IP address loss is a huge problem in enterprise systems and how to solve this problem with TProxy (Transparent Proxy) .
Why does the client’s real IP address disappear?
Normally, when a client connects directly to the database, PostgreSQL sees the source IP in the packet header. However, when a Reverse Proxy (Nginx, HAProxy, etc.) intervenes, the proxy terminates the connection with the client and opens a new connection to the database with its own IP . In this case, PostgreSQL assumes that all traffic is coming from the proxy server;
- Standard Reverse Proxy: Advantages and the Invisibility Issue.
- TProxy (Transparent Proxy): A method of protecting the real IP address.
- Proxy Protocol: A modern alternative to PostgreSQL.
- Comparison Table: Which method should be chosen when?
Standart Reverse Proxy vs. TProxy
Standart Reverse Proxy
In this method, the proxy replaces the IP information on the packet with its own information while routing the traffic.
- Problem: At the application level (like HTTP),
X-Forwarded-Forthe IP address can be passed via a header, but PostgreSQL (L4 protocol) doesn't understand this header directly. - Result:
pg_stat_activityYou will only see the proxy's local IP address.
TProxy (Transparent Proxy)
TProxy enables Linux to forward packets at the kernel level (iptables/routing) without changing the source IP address .
- How it works: When the proxy server transmits the packet, it writes the client’s actual IP address to the Source IP section of the packet.
- Challenge: Network configuration is complex; the database server needs to route its return traffic (gateway) through this proxy again, otherwise a connection cannot be established.
Comparison Table
FEATURES                 | STANDARD PROXY   | TPROXY (TRANSPARENT)
-------------------------|------------------|----------------------
IP Visibility            | Proxy IP         | Real Client IP
Difficulty Level         | Very Easy        | Very Difficult (Network)
Performance              | High             | Medium (Kernel Load)
PostgreSQL Compatibility | Fully Compatible | Infrastructure Dependent
4. Step-by-Step Instructions: How to Install TProxy?
We will perform the installation in two main stages. In advanced HA architectures (as in our scenario where there are 2 HAProxy locations), you must use the VIP (Virtual IP) address as the proxy IP in the following operations. Otherwise, your system will crash during a failover.
Step 1: IP Forwarding and Iptables Rules on the HAProxy Server
On this server, we need to enable packet forwarding (IP forwarding), allow SELinux, and loredirect the returned packets to the (localhost) interface so that HAProxy can capture them.
1. Install the necessary packages and disable Firewalldfirewalld . We use it instead for complex routing iptables.
sudo dnf install haproxy iptables iptables-services iproute -y
sudo systemctl disable --now firewalld
sudo systemctl enable --now iptables
2. Enable Kernel IP Forwarding
echo "net.ipv4.ip_forward = 1" | sudo tee /etc/sysctl.d/99-haproxy-forward.conf
sudo sysctl -p /etc/sysctl.d/99-haproxy-forward.conf
3. Grant SELinux permissions.
sudo setsebool -P haproxy_connect_any 14. Write and Pre-outing Iptables Rules: We mark the responses returned from PostgreSQL nodes (117, 118, 119) 1with a number at the network layer so that HAProxy can process them. For a cluster with 3 nodes, we must enter the rules separately.
sudo iptables -t mangle -F
# 3 DB Node için de kuralı ayrı ayrı gir
sudo iptables -t mangle -A PREROUTING -s **.**.**.117 -p tcp --sport 5432 -j MARK --set-mark 1
sudo iptables -t mangle -A PREROUTING -s **.**.**.118 -p tcp --sport 5432 -j MARK --set-mark 1
sudo iptables -t mangle -A PREROUTING -s **.**.**.119 -p tcp --sport 5432 -j MARK --set-mark 1
sudo iptables-save | sudo tee /etc/sysconfig/iptables
5. Install HAProxy TProxy Routing Service We create a persistent systemd service that will redirect the marked (mark 1) packets to localhost.
sudo tee /etc/systemd/system/haproxy-tproxy.service > /dev/null <<EOF

[Unit]
Description=HAProxy Transparent Proxy Routing Rules
After=network.target iptables.service

[Service]
Type=oneshot
RemainAfterExit=yes
ExecStart=/usr/sbin/ip rule add fwmark 1 lookup 100
ExecStart=/usr/sbin/ip route add local 0.0.0.0/0 dev lo table 100
ExecStop=/usr/sbin/ip rule del fwmark 1 lookup 100
ExecStop=/usr/sbin/ip route del local 0.0.0.0/0 dev lo table 100

[Install]
WantedBy=multi-user.target
EOF
sudo systemctl daemon-reload
sudo systemctl enable --now haproxy-tproxy.service
6. /etc/haproxy/haproxy.cfg Go to the Configure HAProxy file usesrc clientipand add the parameter. (If you are using VIP for HAProxy, bindenter your VIP address in the section).
listen postgres_cluster
    bind *:5432 transparent
    mode tcp
    source 0.0.0.0 usesrc clientip
    server pg_node1 **.**.**.117:5432 check
    server pg_node2 **.**.**.118:5432 check
    server pg_node3 **.**.**.119:5432 check
We restart the service and grant permission to the port:
sudo systemctl restart haproxy
# HAProxy'nin dinlediği Postgres portuna (5432) izin ver
sudo iptables -I INPUT 2 -p tcp --dport 5432 -j ACCEPT
sudo iptables-save | sudo tee /etc/sysconfig/iptables
Step 2: PBR Settings on PostgreSQL Servers (117, 118, 119)
This step must be performed separately on all three PostgreSQL servers . Our goal is to redirect responses from port 5432 to the HAProxy VIP address instead of using the standard gateway when responding to incoming requests.
1. Install the necessary packages and disable Firewalld.
sudo dnf install -y https://download.postgresql.org/pub/repos/yum/reporpms/EL-9-x86_64/pgdg-redhat-repo-latest.noarch.rpm
sudo dnf install -y postgresql18-server iptables iptables-services iproute
sudo systemctl disable --now firewalld
sudo systemctl enable --now iptables
# (If you haven't started the DB yet)
# sudo /usr/pgsql-18/bin/postgresql-18-setup initdb
# sudo systemctl enable --now postgresql-18
2. Write and Permanently Set Ipttables Rules (OUTPUT) This time, we label the responses that Postgres sends out (Output) 2with a number.
sudo iptables -t mangle -F
# PostgreSQL portuna (5432) izin ver
sudo iptables -I INPUT 2 -p tcp --dport 5432 -j ACCEPT
sudo iptables-save | sudo tee /etc/sysconfig/iptables

sudo iptables -t mangle -A OUTPUT -p tcp --sport 5432 -j MARK --set-mark 2
sudo iptables-save | sudo tee /etc/sysconfig/iptables
3. Install Postgres PBR (Policy Based Routing) Service. IMPORTANT:ip a Check the name of the active network card on your server using the command eth0and replace it with ens192or eth1whichever it is in the following dev eth1section. Also, you must enter your HAProxy VIP IP addressvia **.**.**.116 where it says .
sudo tee /etc/systemd/system/postgres-pbr.service > /dev/null <<EOF
[Unit]
Description=Postgres Policy Based Routing to HAProxy
After=network.target iptables.service[Service]
Type=oneshot
RemainAfterExit=yes
ExecStart=/usr/sbin/ip rule add fwmark 2 table 200
ExecStart=/usr/sbin/ip route add default via **.**.**.116 dev eth1 table 200
ExecStop=/usr/sbin/ip rule del fwmark 2 table 200
ExecStop=/usr/sbin/ip route del default via **.**.**.116 dev eth1 table 200

[Install]
WantedBy=multi-user.target
EOF
sudo systemctl daemon-reload
sudo systemctl enable --now postgres-pbr.service
Step 3: Verify the Real IP via pg_stat_activity
To test that everything is working correctly, let’s connect to the database via HAProxy and check the active sessions.
SELECT
pid,
usename AS kullanici_adi,
datname AS veritabani,
client_addr AS ip_adresi,
application_name AS uygulama,
state AS durum,
query AS son_sorgu
FROM pg_stat_activity
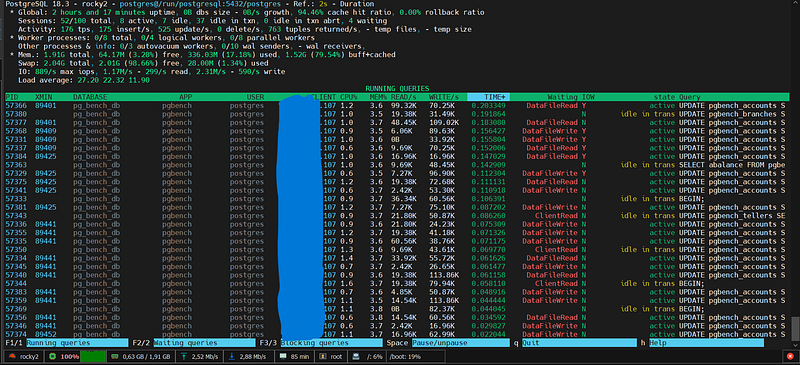
WHERE client_addr IS NOT NULL;If ip_adresiyou see your computer's actual IP address in the column, and not HAProxy's (VIP) IP address, then your TProxy setup has been successfully completed!
Real-World Test: Pgbench Results
We’ve set up the architecture, written our iptables rules, and pg_stat_activitycan now see the clients' real IP addresses. But what's the cost of adding this transparency feature to the network layer?
To measure this, we used PostgreSQL’s own official stress testing tool, `<Text> pgbench`. To push the limits of the network , we designed our test with 50 concurrent clients , 2 threads , and 1000 transactions per client , for a total of 50,000 transactions .
We ran the test in two different scenarios: first directly to the database, and then through the HAProxy (TProxy) we configured.
Scenario A: Direct Database Connection (117)
In our first test, we bypassed all proxy and routing layers and connected directly to the IP address of our active PostgreSQL server. This allowed us to see the pure performance limits (baseline) of our system.
C:\Users\kemal.oz\test&amp;gt;pgbench -c 50 -j 2 -t 1000 -h **.**.**.117 -U postgres pg_bench_db
Password:
pgbench (18.1, server 18.3)
starting vacuum...end.
transaction type: &amp;lt;builtin: TPC-B (sort of)&amp;gt;
scaling factor: 50
query mode: simple
number of clients: 50
number of threads: 2
maximum number of tries: 1
number of transactions per client: 1000
number of transactions actually processed: 50000/50000
number of failed transactions: 0 (0.000%)
latency average = 180.046 ms
initial connection time = 789.349 ms
tps = 277.706734 (without initial connection time)Featured Results (Direct):
- Average latency per operation: ~180 ms
- Transactions per second (TPS): ~277 TPS
- Connection Establishment Time: ~789 ms
Scenario B: Connection via HAProxy / TProxy (116)
In our second test, we connected to HAProxy via our VIP address (IP 116 in our test environment), just like our real-world applications do. This connection had iptables MARK operations and PBR (Policy Based Routing) rules enabled.
C:\Users\kemal.oz\test&amp;gt;pgbench -c 50 -j 2 -t 1000 -h **.**.**.116 -U postgres pg_bench_db
Password:
pgbench (18.1, server 18.3)
starting vacuum...end.
transaction type: &amp;lt;builtin: TPC-B (sort of)&amp;gt;
scaling factor: 50
query mode: simple
number of clients: 50
number of threads: 2
maximum number of tries: 1
number of transactions per client: 1000
number of transactions actually processed: 50000/50000
number of failed transactions: 0 (0.000%)
latency average = 267.154 ms
initial connection time = 1161.073 ms
tps = 187.157764 (without initial connection time)Featured Results (TProxy):
- Average latency per operation: ~267 ms
- Transactions per second (TPS): ~187 TPS
- Connection Establishment Time: ~1161 ms
Analysis of the Results: What Do the Metrics Tell Us?
It’s not enough to simply read data from database monitoring tools (like pg_stat_activity); you need to interpret it. When you start tracking client IPs, it’s normal to see some fluctuations in your system metrics. Here’s the truth behind that data: (Although the client IP is going through haproxy 116, its own IP is showing as 107; you should also see the client IP, let’s go through that.)
Why has latency increased? Why has the transaction speed (TPS) decreased?
When you add proxy or packet processing layers to increase visibility, you may experience the following changes in your performance metrics:
- Additional Cost Per Packet: Using a proxy protocol or TProxy means adding a small amount of data to the beginning of each TCP packet or routing it at the kernel level. This causes a microsecond increase in latency .
- Handshake Bottleneck: The process of verifying IP information for each new connection can reduce the Transactions Per Second (TPS) value, especially in applications that open and close connections frequently and for very short periods (if Connection Pooling is not used).
- CPU and Context Switching: The proxy server’s process of opening packets and reading the IP addresses within them increases CPU load under high traffic. This is a hidden factor that affects the overall system response time.
Conclusion and Future Improvements: Is This Price Worth Paying?
In any technical system, there is no such thing as perfection, only choices. The performance overhead of tracking client IPs is generally negligible compared to the security it provides.
Why should you pay this price?
- Precision Security: During a brute force attack, being able to block not only your proxy but also the attacker’s actual IP address ensures system survivability.
- Debugging: When you receive a database slow complaint, you instantly see which application server or microservice instance is causing the problem.
Improvement Suggestions for the Future:
- Connection Pooling:
PgBouncerMinimize connection setup costs by using tools like these. - Stay at L4 Level: If you don’t need very complex rules at the application level (L7), reduce processor load by using TCP-level (L4) routing.
- Invest in Log Analytics:
pgBadgerAnalyze IP-based traffic trends weekly by adding tools like [ mention specific tools] to real-time monitoring .
In summary: Visibility is one of the rare areas where performance can be sacrificed. It’s always a more professional approach to see the way and drive safely than to speed through the dark.